|
|
|
|
FLOWER POT BIRD BATH
INSTRUCTIONS
You've seen them in magazines, on television and in books.
Well, hunt no further. Here are complete
instructions for you to make your own Terra Cotta Flower Pot Bird Bath.
Your best bet for decorating terra cotta that will be used
outdoors is Patio Paints. I know they are a little pricey, but they are fade resistant,
non-toxic and designed for outdoor use. Patio Paints also make a clear, non-toxic sealant
that will protect your handiwork.
Another option for protecting your work would be a
water-based polyurethane. Read the instruction label and look for soap and water clean-up,
and a product that is meant for use over painted surfaces. I don't recommend oil-based
polyurethane for painted surfaces. It is yellowish in color and over time it will cause
your work to have a yellow tinted appearance. Whatever you choose, remember it won't
be permanent. Your bird bath will likely require refinishing and touching up every other
year. After all, it will be outside in the elements!
For the saucer of your bird bath, try to find a waterproof type that won't require any
treatment inside the bowl, where the water will go. For the outside, Patio Paints are
again preferred.
MATERIALS NEEDED:
One each, 12", 14", and 16"
terra cotta flower pots
One - 20" diameter clay saucer. If you
can find a waterproof saucer, that's even better; you won't have to seal the inside of it.
If you choose pots that are smaller than those listed above, just be sure your saucer is
4" larger than your largest pot. This will keep the bird bath base and bowl in
proportion.
Paints in assorted colors suitable for your
design. You can use Patio Paints or Plaid Durable Paints for the best resistance to
fading. I have successfully used Sears Weatherbeater Satin or Flat as a base coat on many
bird baths.
Patio Paint Clear Gloss Sealant or some other
water based sealant for sealing the painted surfaces of your project. The instructions for
Patio Paints and Plaid Durable Paints don't call for one. I have always used one in spite
of this. A sealant helps protect against water damage. Ultimately, this is up to you.
Oil based polyurethane for sealing the insides
of the flower pots.
Paint Brushes, Sponges, if desired, Stencils
and Stamps
Liquid Nails Construction Adhesive-A small
tube is around $2.00
HOW TO DO IT:
Sand away any rough spots or loose clay
particles on the rim, bottom edge, and outside of the pots and saucer.
Stack the pots, starting with the largest pot,
upside down, on the bottom, then the medium sized pot, then the smallest pot on top.
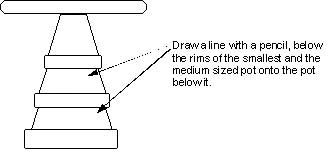
Draw a line with a pencil, below the rims of
the small and medium sized pot onto the pot below it. After you unstack the pots to paint
them, this will help you define the area that will be exposed when the pots are stacked.
You don't want your design to be hidden!
- Seal the inside of all the pots, (and the saucer if it isn't
waterproof), with oil-based polyurethane -2-3 coats. I also recommend sealing the lower
edge of the largest pot, (the edge that will rest on the ground), as opposed to painting
it. If you can, apply the polyurethane in a sunny place. The sun will "bake" the
polyurethane as you work, causing it to set-up a little quicker. Let the polyurethane dry
completely before handling your pots to paint them. A word about Thompson's Water Sealant;
many visitors have suggested using Thompson's Water Sealant in place of polyurethane to
seal terra cotta pots. I have never tried this, so I don't know if it works!
- Now that the pots are sealed inside, after they dry, they are
ready to be painted with your choice of base paint. You can make each pot a different
color, or they can all be the same. Paint them to match your house if you like! Soft,
pastel colors will be best for painting brightly colored flowers and patterns. Remember,
don't bother painting too far above the lines you have drawn which indicate where the pots
will overlap. It is a good idea to go over your lines an inch or so, just to be sure of
good coverage.
|
|
|
|

|
|
 |
 |
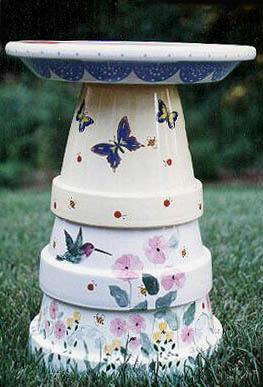
| The two larger pots on this bird
bath are painted light green, the small pot is yellow, and the saucer is white with a blue
scalloped design. |
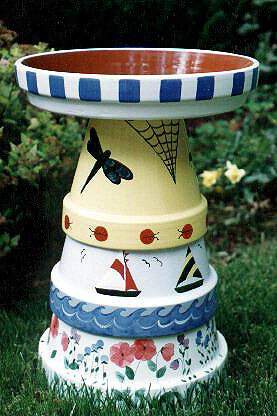
On this bird bath the large pot is painted light green, the medium pot is
light blue, the small pot is yellow and the saucer is white with blue stripes. |
|
|
Now the fun begins! Decorate the pots to your
taste. Flowers, lady bugs and dragonflies are obvious choices. You can also paint your
bird bath with personal touches that suit your home. If you like cats, paint a cat on the
bottom pot. If you live near a lake, sail boats and lighthouses might be suitable. This is
entirely up to you and it's the best part of creating your own!
If you purchase Plaid Decorator Blocks
to decorate your pot, they come with a pattern suggestion sheet and how-to instructions.
You can also buy more than one set of blocks and mix patterns and shapes. You can use
Decorator Blocks, stencils and stamps to help with your design process. Plaid does offer
their products for sale at their web site. See below for specific suggestions.
When you're finished decorating/painting your
bird bath, let it dry thoroughly. Then seal the entire outside, (even the unpainted
outside areas of the pots that won't show), with at least 3 coats of water based
polyurethane. There are several of these on the market, available at craft, hardware and
paint stores. Check to see if the product you select is OK to use over a painted
surface. I stress water based polyurethane because oil based products have a yellow tint
and will likely discolor your design.
|
|
HOW to INSTALL your BIRD BATH:
- I recommend that you glue the saucer to the smallest pot. This
will prevent critters from breaking it when they climb up for a drink of water! This is
also safer if you have children. To glue the two pieces together, run a generous bead of
Liquid Nails Construction Adhesive on the smallest pot where it will be attached to the
saucer. Always hold both the saucer and smallest pot when handling
them, even after they are glued together.
- Turn the saucer over on the floor and place
the small pot in center of saucer bottom-let dry overnight. I don't feel it's necessary to
glue the remaining pots together. It should be stable enough without doing this. Besides,
if it's all glued together, how would you move it inside for winter storage? It would be
nearly impossibly to lift!
|
|
|
|
Glue the top two pieces together like this!

|
Do not place your bird bath directly on the ground.
It will last longer if you minimize contact with the ground and moisture.
- Set on treated lumber or a patio stone.
- Conceal the lumber or stone with pebbles or mulch if desired.
- Starting with the largest pot, carefully stack pots into position. If they don't fit
together without wiggling, use self-adhesive foam weather stripping, (the kind you use
around windows and doors), to fill in the gaps. Apply the weather stripping to the inside
of the rim, (where it won't be seen), of the pot that's wiggling! The foam will help to
fill in these gaps and stabilize the bird bath.
- Gently work the pots into place. Do not press down on the pots or saucer - they will
crack!
|
|
| HOW to CLEAN and STORE your BIRD BATHTo clean, wash with warm water
and a mild detergent.
Don’t use abrasive cleaners or scrubby
pads. They will
scratch the finish!
Bring your bird bath inside to a warm, dry
location for the winter months.
|
|
 |
CLICK HERE FOR A PRINTER FRIENDLY VERSION OF THESE
INSTRUCTIONS. YOU WILL NEED ADOBE ACROBAT READER TO OPEN AND PRINT THE PAGE. DON'T HAVE
ADOBE ACROBAT READER? IT'S FREE!
JUST CLICK THE "GET ACROBAT READER" BUTTON FOR THE DOWNLOAD. |
|
|
. . . . . . . . . . |
| STILL NEED MORE INFORMATION? |
If you would like pattern ideas for your bird bath, here are few publications that I have used. They all feature flower pot designs which can be easily adapted for use on a bird bath. Some of the publications
listed are older and quantities are limited. Search for these at Amazon to order.
Leisure Arts - Patio Pots - #1741
Helen's Pots & Mailboxes - Fun to Paint #9232
Design Originals - Garden Angels & Mice #3119
Design Originals - Painted Pots - #2361
Design Originals - Garden Guardians - #3170
Design Originals - Garden Delights - #3120
Block Printing for Outdoor Living - Decorator Blocks #9197
Outdoor Companion - Mary Engelbreit - This book
is loaded with beautiful photos and ideas for outdoor projects, (including a bird bath). |
|
ADDITIONAL SOURCES FOR
BOOKS and CRAFT SUPPLIES
Col
House Designs
Plaid -
Search for 'paint a flower pot' for ideas and
supplies.
Leisure Arts -
Search for 'flower pots' for ideas and supplies.
Design Originals - 817-877-0067 - Publications shown above.
Some may be out of print. |
|
I hope this information makes
your flower pot bird bath project a little easier.
Have fun! - Patricia :) |
|
| |
|
. . . . . . . . . .
|
|
Copyright © - Patricia Petrat -
Patricia's Pots - All rights reserved. |